Image Map

Wednesday, June 8, 2022

Extreme Makeover - Shelf Edition


I finally found time to tackle a project that has been on my TO DO LIST for the past three years. I was beginning to wonder if I was ever going to get it. 

After completing our end of the year inventory and weeding several titles from the collection, I gave my EASY - NONFICTION section a complete makeover.


I started by ordering 25 of {these}buckets from Walmart.  They are heavy duty and fairly wide so they worked perfectly for the oversized books.

Next, I set to work dividing books into preliminary categories. I will admit, this part probably took the longest. As you can see there were some random titles that didn't really fit into any specific categories so I left them on the top shelf and just kept them organized by their call numbers.

It was important to me that everything be kept organized in Destiny so I created sublocations for each category and updated the title info. This alone was a BIG project . . . but I think it will be helpful in the long run when students/teachers are trying to locate a specific book. 

Once I had all of my category names I started making labels for the buckets. I went ahead and put labels on 2 sides of each bucket. This will allow me flexibility on which direction the buckets can go on the shelves.


I don't have the labels available yet in my TpT store . . . but they will be coming soon. I used so much clipart making them that it's going to take some time to get all of that info put together so I can give the creators of it acknowledgements.

Next, I set to work on making the shelf dividers.


There were several series of books that I recently purchased that I didn't want to separate quite yet so I kept them together and made individual labels for them. In the picture above you can see what I'm referring to.

I was so happy with how this section of my library turned out that decided I couldn't stop there . . . so I started making more shelf markers for my Fiction sections.

All of this is available in the newest addition to my TpT store.


 Click {here} to see everything you need to give your library shelves an extreme makeover just like I did.

Wednesday, May 25, 2022

Peace Out

 Another successful year in the Media Center has come to an end.

All 13,249 books have been inventoried.

Only 19 books were unaccounted for after inventory.

There were 22 books not returned by students.

Year 3 was definitely the best yet!

I'm not going to lie . . . I've been counting down the days until summer break just like the kids have (and I imagine a few of you too). Next week I am California bound and I have a bag full of books to get started on while I lay by the pool. More to come on that soon!!!

But, before I checked out of my building this morning I had an overwhelming sadness. When I looked at this big quiet space, with the blinds all pulled down, it seemed like the {pause} button has been pushed on all the magic this space provided students and staff this school year.

Take a look for yourself . . .


Our school library ALWAYS has kids in it. Whether they are coming down to check out a new book, return books, or just say hello, it is NEVER this quiet. 

And the reason . . . is my library squad. Both of these ladies are new to their roles this year and they have absolutely rocked it! They make sure EVERY student (even the ones who are sometimes hard to love) feel loved!  

If you are like me and have a library team that you would like to give a "shout out" to please reply with a picture and the name of your school. 

Sunday, May 22, 2022

End of the Year Report

 It's hard to believe that it is already the end of another school year. As the year winds down I like to share circulation information with my administrators, teachers and parents. 


I used Microsoft Publisher to create this document. 

If you would like to have a copy just drop me an email at checkitoutwithmrsbailey@gmail.com

I used fonts from BBfonts. They are my favorites!!! If you don't have those fonts you can always choose your own.  Be warned though, it might just mess up the formatting a little bit.

So the next question is . . . where did I find all of the information for this report. And the answer is easy {DESTINY}.

PART 1: How to find the Top 10 book titles.

Go to the [REPORTS] tab and click on [LIBRARY REPORTS].


Scroll all the way to the bottom and click on [TOP/BOTTOM TITLES].


Now all you need to do is set the number of titles you would like to see and the date range.


Once I got all of this information I googled the title of each book and inserted a picture of the cover and recorded how many times each book had been circulated.

Now that I think about it I made this step harder than it had to be. I could have just clicked on each titles and seen a picture of the book cover!!! LESSON LEARNED!!!

PART 2: How to find the monthly circulation numbers.

Go to the [REPORTS] tab and click on [LIBRARY REPORTS].


Scroll all the way to the bottom and click on 
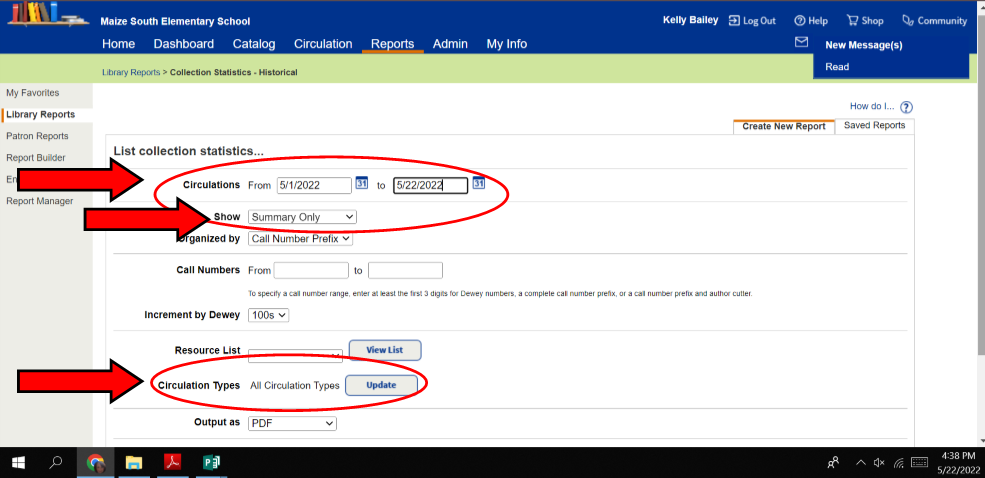
[COLLECTION STATISTICS - HISTORICAL].


Now all you need to do is choose the date range. I did mine monthly. I also made sure I just saw the [SUMMARY] and set the circulation types to [ALL CIRCULATION TYPES].


PART 3: How to find the number of new titles added to your collection.

Go to the [REPORTS] tab and click on [LIBRARY REPORTS].


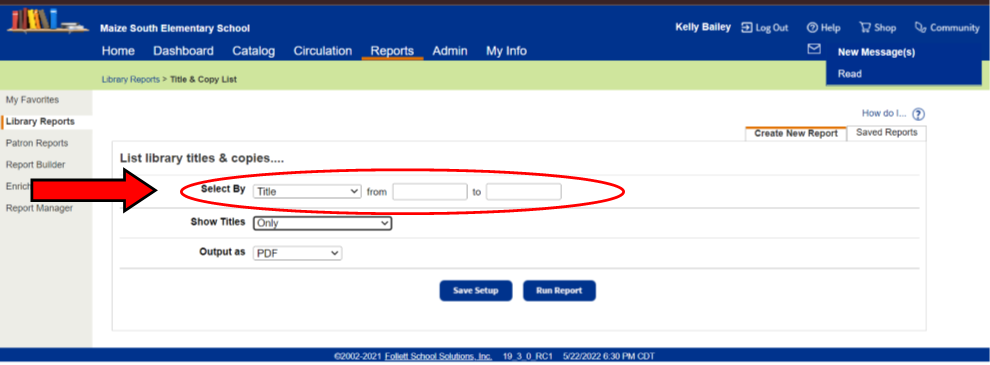
Click on [TITLE & COPY LIST].


Now all you need to do is choose the date range to find out how many new copies you added during the school year. I have to admit, I was shocked when I saw how many I added.


There you have it . . . if I left something out please let me know. I hope there are a few LMS's out there that will be able to use this information

Sunday, November 21, 2021

Reindeer Literature Unit

It's hard to believe that Christmas is just around the corner.  This year has seriously flown by.  To get myself as excited as my students about the upcoming holiday season I ordered several new reindeer themed books to add to our library collection.  After reading each book I decided it was time to start working on a literature based unit that I could use and share with my fellow district library ladies!  We are a close knit group and we are always sharing lesson plans and ideas.  One activity turned into two and before I knew it I had an entire set of differentiated worksheets and games to go with each book.

 As many of you may know, I spent 19 years teaching 1st grade prior to becoming a Media Center Specialist three years ago.  Thanks to my time in the classroom I developed a LOVE of creating activities to go with books.  Not only do I LOVE reading books, but I also like creating activities that I can share with other teachers and librarians.

So, without further ado . . . here is my new reindeer unit.
  
Hopefully you already have some or all of these books in your collection.  
If not, there are links in the unit for each book on Amazon.
I always like to share a {sneak} peek at everything that is included.
Activities include a variety of  differentiated sequencing, recalling story elements, writing prompts, rhyming word activities and games that can be used with student in grades K-3.

Head on over to my TpT store to snag a copy.

 - or -

If you would like a chance at winning a free copy of this unit just comment below with your favorite Reindeer themed read-aloud.  I will choose one winner at random on Thanksgiving day.  The winner will be announced here on the blog. 

Sunday, September 19, 2021

Readers Among Us


It's Scholastic Book Fair Time!!! 


I have received several questions so I thought I would devote an entire post on how I plan, create and get my Scholastic Book Fair ready to go!

Step 1:  Choose A Theme

I always try to come up with a theme that I think will get my students excited. This year I decided to go with Readers Among Us . . . because what elementary kiddos don't love Among Us Crewmates and Imposters?  It also tied in perfectly because there is a book called The Imposters Guide to Among Us featured in the Book Fair Student Flyer.

Once I had my theme picked out I started looking for clipart.  I found this basic set of crewmates clipart on TpT from Miss Tizzy's shop.  


Step 2:  Decorate

Then I set to work creating and decorating the entrance into my library.  Here is what the display looks like that I have covering the windows in the hallway.  You can't even begin to imagine all the excitement when the kid saw it for the first time.  They were flipping out!!!


To get the large crewmates I simply enlarged the clipart to fit a 24"x36" page using Publisher.  To do this all you have to do is open a new document and choose Page Design.  Then go change the width to 24" and the height to 36".

Next, insert the clipart and stretch it to fit the page.


When you print you will choose the tiled option.


Finally, you will just have to piece the pages together.  I'm not going to lie . . . this does take some time and patience.  But, when you are done and you have laminated and cut out the characters it will be worth the trouble!!!

Now that the characters are done it's time to make the letters.  I usually do this one of two ways.  Sometimes I use my Cricut to cut out the letters or I create the letters using WordArt in Publisher.  I always laminate the pages before I cut them out so they can be used again in the future.

Click {here} to download a complimentary set of the letters used in this display.


Step 3:  Create Excitement in the Library

Last week when students visited the library for their 30 minute lesson we watched the Book Fair Preview Video and discussed specific details about how the Book Fair would be run this year.  Thankfully, parents were given the option to attend conference in person or virtually.  For those attending in person (which seems to be the majority) they will do their shopping on Thursday before or after their child's scheduled conference.  For those attending virtually, their child can bring money to school and shop on Wednesday.


I also created an activity sheets for students to work on after the Book Preview Video.  

The one for K-1 students was pretty basic.  I told them it was an invitation for them to take home to their parents.  They worked really hard to color the front neatly.


The activity sheet I created for my 2nd - 4th grade students had a little bit more to it.  I had them begin by answering the 7 questions on the back.  All of the answers could be found in their Book Fair Flyer.


My students all come an additional 30 minutes each week to check out.  During that time they had the choice to read quietly on their assigned bean bag chair -or- color an Among Us character themed bookmark that I found for FREE on TpT.

Click {here} to download your FREE set.


Step 4:  Set Up the Book Fair

This is by far my favorite, but also the hardest part of the Book Fair.  With the help of my two aides we got everything set up on Friday.  We are lucky not have students on Fridays this year so we closed the library for the day and got to work.  I can't wait for the kids to come in tomorrow and see it!!!!


Step 5:  Book Fair Preview & Wishlist

Once I have my Book Fair set up it's time to let the kids preview everything.  My first year the Scholastic rep encouraged me to let the kids pick items up, look through the books, etc . . . so that is exactly what I let them do.  We do talk about taking care of the books because no one would want to buy one that looked used.  

I also let my students create a Wish List to take home.  

For the 2nd - 4th graders they can do this independently by writing down the title and price of the items they want.  


For the K-1 kiddos we let them pretend shop.  They get to pick 5 items and then they bring them to us and we scan them using the Scholastic Register {in training mode}.  We then print their receipt and attach it to a note.  Then students have to go put their items back where they got them.  They absolutely LOVE doing this!!!


Step 6:  Shopping & Book Bucks

Instead of having teachers create Wish Lists or pull books they would like to have for their classroom I sell Book Bucks to parents.  They have the option at check-out to purchase Book Bucks for their child's teacher.  They are available in a variety of denominations.  We ring them up as Gift Certificates and students fill out the Book Bucks to add to their teacher's pocket on my bulletin board.  


 I copy each denomination on a different color of paper.

Click {here} to download a copy. 


Sunday, August 22, 2021

Back to School

Last Tuesday we kicked off our 2021-2022 school year.  It was so much fun to see so many smiling faces on the first day.  Throughout the week several classes came through and toured the media center.  This week we are excited to begin having classes.  

We will spend the first part of the week reviewing library rules and expectation and then at the end of the week classes will begin checking out books.  I'm also planning to begin featuring a read aloud each week for every class after everyone has a book checked out.  I'm hoping this will help get students excited about specific book series and our Battle of the Books & William Allen White Reading Lists.

This template, along with others, is available {here} in my TpT store.


Our library squad is so excited to begin seeing kiddos!

Here's a little {sneak} peek at our fun space . . .


The graphic novel section (which is pictured above) is definitely the most popular area in our library.  Students in grades 2-4 are allowed to have two books checked out.  We had to limit it to only one graphic novel at a time.  It's safe to say that our graphic novel section won't look like this again until the end of the year. 


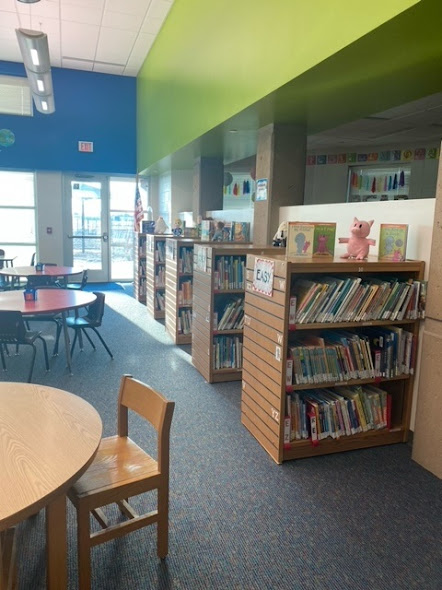
This section of the library is mostly used by our KDG & 1st Grade Students.  


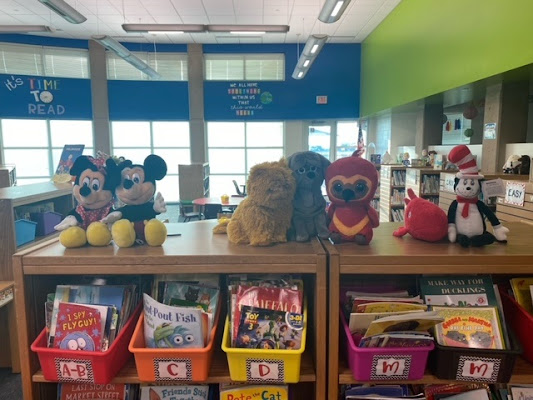
It's so exciting to have all of our stuffed book characters on display this year.  If you haven't checked out the books and plush animals at Kohl's you are missing out.  

Click {here} to see what is available at a Kohl's store near you.

I really wanted to have some shelves this year up by my teaching area to feature books I love.  So, I got the idea to create shelves using a picture.  Believe it or not, these are not REAL wooden shelves.  They are just pictures that I blew up and printed/laminated.  They are definitely super deceiving to the eye.  


If you are interested in making a set of shelves just like these . . . here is the trick!

Open a Publisher Document.
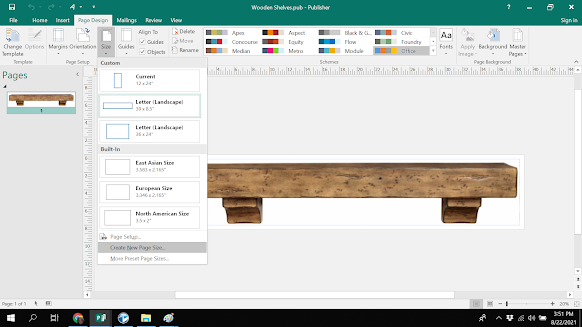
Go to Page Design and select Size.
Then scroll to the bottom and choose Create New Page Size.


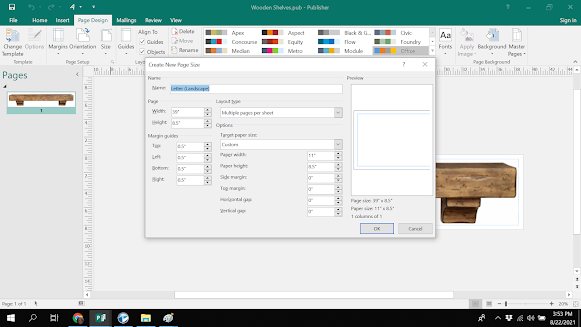
Here you can adjust the width and the height of the pages.

It's best to keep the height at 8.5" if you are creating a landscape design like I did.  

This is the same dimension as a standard piece of paper. 

 I however increased the length to 39". 


After you insert your picture and get it sized correctly choose Print. 

As you can see this will take 4 sheets of paper.  


After you have assembled the 4 pages put it through your laminator and cut it out.  

Pretty easy . . . huh?!?!  

The possibilities are endless when you know this little trick.


I hope all of you have a great start to your year!!!  

If you have a bulletin board design you are proud of please post it in the comments.  

Tuesday, August 3, 2021

The HEART of the SCHOOL

I firmly believe that the LIBRARY is the HEART of the SCHOOL.  

I often tell friends and colleagues that I feel like the school bartender!

Instead of serving drinks (well maybe some iced tea from time to time) I get to serve up some book recommendations, visit with all of the classroom teachers about the fun things they are doing with their students and hear about their families.

Keeping parents informed about the library is also important to me.  So to start the school year off I always put together a newsletter to send home.  It includes information I think parents NEED to know.  This year I chose to also include information about our MSE Google Site and our Facebook page.

I'm happy to share the template with you so you can personalize it for your library. 

 Feel free to email me at checkitoutwithmrsbailey@gmail.com for the Publisher version.